How to create nodeless AWS EKS clusters with Karpenter for autoscaling
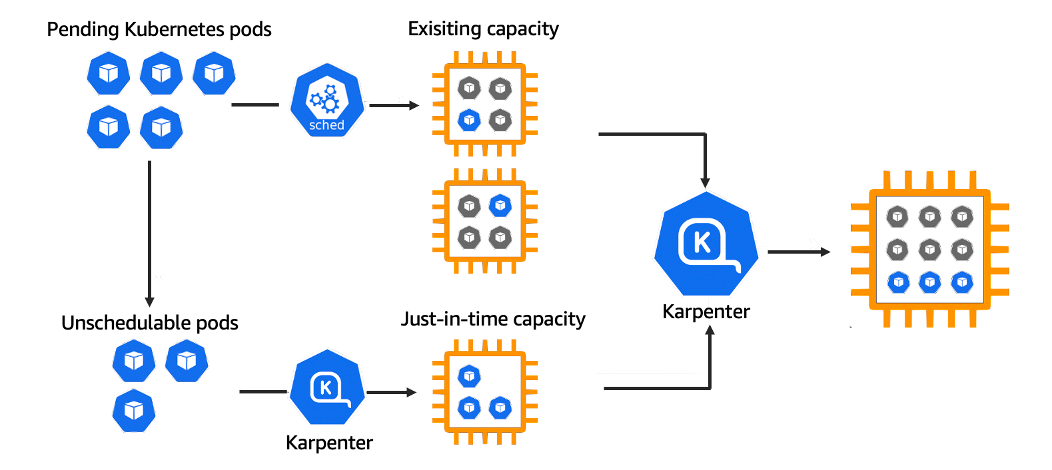
Karpenter is an exciting Kubernetes autoscaler that can be used to provision “nodeless” AWS EKS clusters. Nodeless means the EKS cluster can be provisioned with zero nodes to start with, and the Fargate hosted Karpenter pods scale up the actual worker nodes. Here are my learnings from setting it up.
There are plenty of “getting started” and “how to” posts available online for getting Karpenter running. However, most use eksctl or the Terraform module to do all the heavy lifting. In this post we pull back the covers and set it up without eksctl and without the community Terraform modules, yet still using Terraform.
Background
Karpenter is a project by AWS which they announced as ready for production in November 2021. It is a Kubernetes operator that manages Kubernetes worker nodes directly, based on provisioner requirements, rather than scaling existing node groups, which is how the popular Cluster Autoscaler works.
Why Karpenter?
Karpenter promises to:
- Minimize operational overhead by not having to manage static infrastructure (such as node groups), making everything declarative using Kubernetes Custom Resource Definitions.
- Lower compute costs by removing under-utilised nodes and looking for cheaper and more efficient workloads.
- Improve application availability by responding quickly and automatically to changes in application load, scheduling and resource requirements.
The above promises are taken from the Karpenter website but I have reordered them according to my own personal priority.
1. Minimize operational overhead
Cluster Autoscaler requires you to manage static node groups as part of the cluster infrastructure making it more cumbersome to configure “the right workload”. Karpenter, on the other hand, does this declaratively using Provisioners (and Node Templates) allowing you to manage the set of available nodes the same way you manage your workloads that will use them: via the Kubernetes API. This is especially useful if you work with a wide variety of different workload types (i.e. ones that are compute/memory intensive).
Karpenter also makes it easier to use AWS Spot instances. If you plan to use spot instances, it is recommended to enable interruption handling using AWS SQS, which we will also cover in this post.
2. Lower compute costs
By default Karpenter is more aggressive than Cluster Autoscaler when it comes to consolidating workloads and reducing the number of nodes that you require, and thereby reducing your cloud costs. This is great for the most part and if you have applications that should not be de-provisioned you can configure that. For me it’s something that I really like, just ensure Pod Disruption Budgets are set so that your workloads are not affected by de-provisioned pods.
3. Improve application availability
I don’t have much to add here, other than Karpenter is fast (which is relative). Cluster Autoscaler on AWS EKS is slow, it takes several minutes to provision new nodes in my experience (that is, the time you wait from deploying a pod that requires a scale-up). Karpenter has consistently provisioned new nodes in under a minute during my testing. That is a significant improvement!
Fargate
Before we get stuck in, let’s address the most common question I have received: why Fargate? Fargate on EKS is a nice idea, however practically, there are a lot of considerations you need to take into account. For this reason, I have not used Fargate on EKS previously as I am mostly involved in building platforms on EKS and Fargate would be too restrictive. However, using Fargate just for Karpenter is a win-win, as Karpenter needs to be run somewhere in order to provision new nodes for the general workloads that will run on the Karpenter provisioned EC2 instances.
Now, let’s get to the topic: Karpenter on AWS EKS with Fargate for a nodeless cluster (that is, nodeless until Karpenter schedules EC2 instances for your real workloads). And because Karpenter is fast, your cluster is only nodeless for a very short period of time!
Setting it up
Three IAM Roles to Rule Them All
Karpenter will require three IAM roles, and this is most of the work involved with getting Karpenter up and running.
- Karpenter Controller: used by the Karpenter pods to be able to interact with AWS services (e.g. to manage EC2 instances)
- Fargate Profile: the EKS Fargate Profile requires a pod execution role to provision and connect Fargate nodes to the cluster.
- Karpenter Instance Profile: is used by the EC2 instances that Karpenter launches. The instance profile requires an IAM role.
1. Karpenter Controller
For the Karpenter controller we will need an IAM role that the Karpenter pods will assume. We use IAM Roles for Service Accounts (IRSA) to give Kubernetes service accounts access to AWS. If you need help setting that up, check out my other blog on the topic. In the below example the document policy grants the service account karpenter in the namespace karpenter to assume the IAM role that we attach this policy to.
Regarding the actual permissions we give to the IAM role, I used the official CloudFormation template and Terraform module as references and came up with the below. Please review it yourself before putting this in production.
#
# IAM Role
#
resource "aws_iam_role" "karpenter" {
  description        = "IAM Role for Karpenter Controller (pod) to assume"
  assume_role_policy = data.aws_iam_policy_document.karpenter_assume_role.json
  name               = "${var.cluster_name}-karpenter-controller"
  inline_policy {
    policy = data.aws_iam_policy_document.karpenter.json
    name   = "karpenter"
  }
}

#
# IRSA policy
#
data "aws_iam_policy_document" "karpenter_assume_role" {
  statement {
    actions = ["sts:AssumeRoleWithWebIdentity"]
    condition {
      test     = "StringEquals"
      values   = ["system:serviceaccount:karpenter:karpenter"]
      variable = "${var.cluster_oidc_url}:sub"
    }
    condition {
      test     = "StringEquals"
      values   = ["sts.amazonaws.com"]
      variable = "${var.cluster_oidc_url}:aud"
    }
    principals {
      type        = "Federated"
      identifiers = [var.cluster_oidc_arn]
    }
  }
}

#
# Inline policy
#
data "aws_iam_policy_document" "karpenter" {
  statement {
    resources = ["*"]
    actions   = ["ec2:DescribeImages", "ec2:RunInstances", "ec2:DescribeSubnets", "ec2:DescribeSecurityGroups", "ec2:DescribeLaunchTemplates", "ec2:DescribeInstances", "ec2:DescribeInstanceTypes", "ec2:DescribeInstanceTypeOfferings", "ec2:DescribeAvailabilityZones", "ec2:DeleteLaunchTemplate", "ec2:CreateTags", "ec2:CreateLaunchTemplate", "ec2:CreateFleet", "ec2:DescribeSpotPriceHistory", "pricing:GetProducts", "ssm:GetParameter"]
    effect    = "Allow"
  }
  statement {
    resources = ["*"]
    actions   = ["ec2:TerminateInstances", "ec2:DeleteLaunchTemplate"]
    effect    = "Allow"
    # Make sure Karpenter can only delete nodes that it has provisioned
    condition {
      test     = "StringEquals"
      values   = [var.cluster_name]
      variable = "ec2:ResourceTag/karpenter.sh/discovery"
    }
  }
  statement {
    resources = [var.cluster_arn]
    actions   = ["eks:DescribeCluster"]
    effect    = "Allow"
  }
  statement {
    resources = [aws_iam_role.eks_node.arn]
    actions   = ["iam:PassRole"]
    effect    = "Allow"
  }
  # Optional: Interrupt Termination Queue permissions, provided by AWS SQS
  statement {
    resources = [aws_sqs_queue.karpenter.arn]
    actions   = ["sqs:DeleteMessage", "sqs:GetQueueUrl", "sqs:GetQueueAttributes", "sqs:ReceiveMessage"]
    effect    = "Allow"
  }
}
2. Karpenter Fargate Profile
To use Fargate (and this is nothing specific to Karpenter), you need a Fargate Profile (that specifies the pods to run), an IAM role for Fargate to run as (AKA pod execution role) and the necessary policy attachments for the IAM role.
The below Terraform blocks creates our AWS EKS Fargate profile and the pod execution (IAM) role with the necessary policy attachments.
#
# Fargate profile
#
resource "aws_eks_fargate_profile" "karpenter" {
  subnet_ids             = var.cluster_subnet_ids
  cluster_name           = var.cluster_name
  fargate_profile_name   = "karpenter"
  pod_execution_role_arn = aws_iam_role.fargate.arn
  selector {
    namespace = "karpenter"
  }
}

#
# IAM Role
#
resource "aws_iam_role" "fargate" {
  description        = "IAM Role for Fargate profile to run Karpenter pods"
  assume_role_policy = data.aws_iam_policy_document.fargate.json
  name               = "${var.cluster_name}-karpenter-fargate"
}

#
# Assume role policy document
#
data "aws_iam_policy_document" "fargate" {
  statement {
    actions = ["sts:AssumeRole"]
    effect  = "Allow"
    principals {
      type        = "Service"
      identifiers = ["eks-fargate-pods.amazonaws.com"]
    }
  }
}

#
# Role attachments
#
resource "aws_iam_role_policy_attachment" "fargate_attach_podexecution" {
  policy_arn = "arn:aws:iam::aws:policy/AmazonEKSFargatePodExecutionRolePolicy"
  role       = aws_iam_role.fargate.name
}

resource "aws_iam_role_policy_attachment" "fargate_attach_cni" {
  policy_arn = "arn:aws:iam::aws:policy/AmazonEKS_CNI_Policy"
  role       = aws_iam_role.fargate.name
}
3. Karpenter Instance Profile
An Instance Profile is required for each node that Karpenter provisions. You can configure the aws.defaultInstanceProfile setting in the Karpenter ConfigMap as a default for all nodes, or on the Node Template that is referenced by your Provisioner.
#
# Instance profile
#
resource "aws_iam_instance_profile" "karpenter" {
  role = aws_iam_role.eks_node.name
  name = "${var.cluster_name}-karpenter-instance-profile"
}

#
# IAM Role
#
resource "aws_iam_role" "eks_node" {
  description        = "IAM Role for Karpenter's InstanceProfile to use when launching nodes"
  assume_role_policy = data.aws_iam_policy_document.eks_node.json
  name               = "${var.cluster_name}-karpenter-node"
}

#
# Policy attachments
#
resource "aws_iam_role_policy_attachment" "eks_node_attach_AmazonEKSWorkerNodePolicy" {
  policy_arn = "arn:aws:iam::aws:policy/AmazonEKSWorkerNodePolicy"
  role       = aws_iam_role.eks_node.name
}

resource "aws_iam_role_policy_attachment" "eks_node_attach_AmazonEC2ContainerRegistryReadOnly" {
  policy_arn = "arn:aws:iam::aws:policy/AmazonEC2ContainerRegistryReadOnly"
  role       = aws_iam_role.eks_node.name
}

resource "aws_iam_role_policy_attachment" "eks_node_attach_AmazonEKS_CNI_Policy" {
  policy_arn = "arn:aws:iam::aws:policy/AmazonEKS_CNI_Policy"
  role       = aws_iam_role.eks_node.name
}

resource "aws_iam_role_policy_attachment" "eks_node_attach_AmazonSSMManagedInstanceCore" {
  policy_arn = "arn:aws:iam::aws:policy/AmazonSSMManagedInstanceCore"
  role       = aws_iam_role.eks_node.name
}
Enable Interruption Handling (optional)
Karpenter supports native interruption handling which requires an AWS Simple Queue Service (SQS) where the interruption events are written that the Karpenter controller responds to. And it’s quite easy to setup (note: we already added permissions for the Karpenter Controller AWS IAM role to access the AWS SQS queue above).
#
# SQS Queue
#
resource "aws_sqs_queue" "karpenter" {
  message_retention_seconds = 300
  name                      = "${var.cluster_name}-karpenter"
}

#
# Node termination queue policy
#
resource "aws_sqs_queue_policy" "karpenter" {
  policy    = data.aws_iam_policy_document.node_termination_queue.json
  queue_url = aws_sqs_queue.karpenter.url
}

data "aws_iam_policy_document" "node_termination_queue" {
  statement {
    resources = [aws_sqs_queue.karpenter.arn]
    sid       = "SQSWrite"
    actions   = ["sqs:SendMessage"]
    principals {
      type        = "Service"
      identifiers = ["events.amazonaws.com", "sqs.amazonaws.com"]
    }
  }
}
Deploying Karpenter
So far we have only looked at creating the necessary AWS cloud resources that Karpenter requires. We need to deploy Karpenter on our cluster as well. You can do this with a Helm chart, like the Terraform example does. The deployment is fairly simple and most of the configuration is done using the Karpenter ConfigMap.
Pick your poison and get Karpenter running! All the values like IAM role ARNs, SQS name, and cluster endpoint are all dynamically computed, so here’s my not-so-useful Helm command that I would run if I had to.
KARPENTER_VERSION="v0.25.0"

CLUSTER_NAME=...                  # Name of the EKS Cluster
CLUSTER_ENDPOINT=...              # Endpoint for the EKS Cluster
KARPENTER_IAM_ROLE_ARN=...        # IAM Role ARN for the Karpenter Controller
KARPENTER_INSTANCE_PROFILE=...    # InstanceProfile name for Karpenter nodes
KARPENTER_QUEUE_NAME=...          # Name of the SQS queue for Karpenter

helm upgrade --install karpenter oci://public.ecr.aws/karpenter/karpenter \
  --version "${KARPENTER_VERSION}" \
  --namespace karpenter \
  --create-namespace \
  --include-crds \
  --set settings.aws.clusterName=${CLUSTER_NAME} \
  --set settings.aws.clusterEndpoint=${CLUSTER_ENDPOINT}
  --set serviceAccount.annotations."eks\.amazonaws\.com/role-arn"=${KARPENTER_IAM_ROLE_ARN} \
  --set settings.aws.defaultInstanceProfile=${KARPENTER_INSTANCE_PROFILE} \
  --set settings.aws.interruptionQueueName=${KARPENTER_QUEUE_NAME} # Optional
As per the above Fargate Profile, pods in the karpenter namespace will be scheduled onto Fargate nodes and this could take ~1 minute. So once you have deployed Karpenter and there are no noticeable errors, just give it a moment for the Fargate nodes to be scheduled for you. Once that is done, you should see more nodes being scheduled (and managed) by Karpenter.
Configuring a Provisioner
In order for Karpenter to provision nodes you must define at least one provisioner, and the provisioner requires a node template (multiple provisioners can reuse the same node template). The node template to use for a provisioner is given by the spec.providerRef which is not so obvious and not that well documented, but anyway. Also both provisioners and node templates are cluster resources (not namespaced).
You can pretty much copy the default example on the provisioners page and remove the parts you do not care about, something like this.
apiVersion: karpenter.sh/v1alpha5
kind: Provisioner
metadata:
  name: default
spec:
  # References the AWSNodeTemplate called "default"
  providerRef:
    name: default
  requirements:
    - key: "karpenter.k8s.aws/instance-category"
      operator: In
      values: ["m"]
    - key: "karpenter.k8s.aws/instance-cpu"
      operator: In
      values: ["4", "8"]
    - key: "karpenter.k8s.aws/instance-hypervisor"
      operator: In
      values: ["nitro"]
    - key: "topology.kubernetes.io/zone"
      operator: In
      values: ["eu-north-1a", "eu-north-1b", "eu-north-1c"]
    # Let's go all in on spot instances
    - key: "karpenter.sh/capacity-type"
      operator: In
      values: ["spot"]

  # Resource limits constrain the total size of the cluster.
  # Limits prevent Karpenter from creating new instances once the limit is exceeded.
  limits:
    resources:
      cpu: "1000"
      memory: 1000Gi
  # Kill each node after one hour just for kicks
  ttlSecondsUntilExpired: 3600
And we need to create our AWSNodeTemplate resource as well. Note that the subnet selector and security group selector are required, and I use the default Karpenter tags karpenter.sh/discovery: <CLUSTER_NAME> on the private subnets for the EKS cluster and security group(s) for the worker nodes (make sure you configure this when creating your EKS cluster). This is so that Karpenter can provision nodes in the correct subnets with the appropriate security group(s) attached.
apiVersion: karpenter.k8s.aws/v1alpha1
kind: AWSNodeTemplate
metadata:
  name: default
spec:
  securityGroupSelector:
    karpenter.sh/discovery: <CLUSTER_NAME>
  subnetSelector:
    karpenter.sh/discovery: <CLUSTER_NAME>
  tags:
    karpenter.sh/discovery: <CLUSTER_NAME>
Once you apply the Provisioner and AWSNodeTemplate (with your updated values) and you deploy some pods you should see Karpenter provision and connect new nodes to your cluster, and it’s fast! Consistently under 1 minute when I have been testing it.
AWS also open sourced a tool they developed internally while testing Karpenter that you might find interesting when playing around with Karpenter: https://github.com/awslabs/eks-node-viewer.
Conclusion
Personally I really like Karpenter. Not only does it shift the configuration of Kubernetes worker nodes to the Kubernetes control plane, making it easier and more flexible to configure “the right” nodes but it also reduces cloud costs by consolidating pods and draining nodes that are being underutilised. And this is right out of the box.
One incredible feature to highlight is TTL for node expiry. This is really useful for making sure nodes are recycled at some specified interval, as well as preventing costly compute types running for long periods of time. The longer a node is running the greater the chance of it being compromised, or failing, so setting a reasonable value is highly recommended (if omitted, nodes never expire).
I think Karpenter is especially interesting if you are working with a wide range of different compute types, e.g. traditional web services, machine learning models or other compute/memory intensive workloads.
One point to consider is that (as of this writing) Karpenter only works on AWS EKS. There is an open issue for Azure AKS but I have not found anything online about Google’s GKE and Karpenter. This might affect you, if you want to keep your clusters across clouds as similar as possible (e.g. using Cluster Autoscaler), or it might not.
I hope you found this post useful and please reach out to me if you have questions!