Quickstart - Jenkins (JCasC) in Kubernetes
Jenkins is a well-proven CI tool and a key link in the software delivery chain of many organisations, but managing one or more Jenkins instances adds an overhead to your teams. Defining your Jenkins instances as code and automating their scaling is a great way to reduce this management overhead, while improving the maintainability, stability and disaster recovery of your deployments.
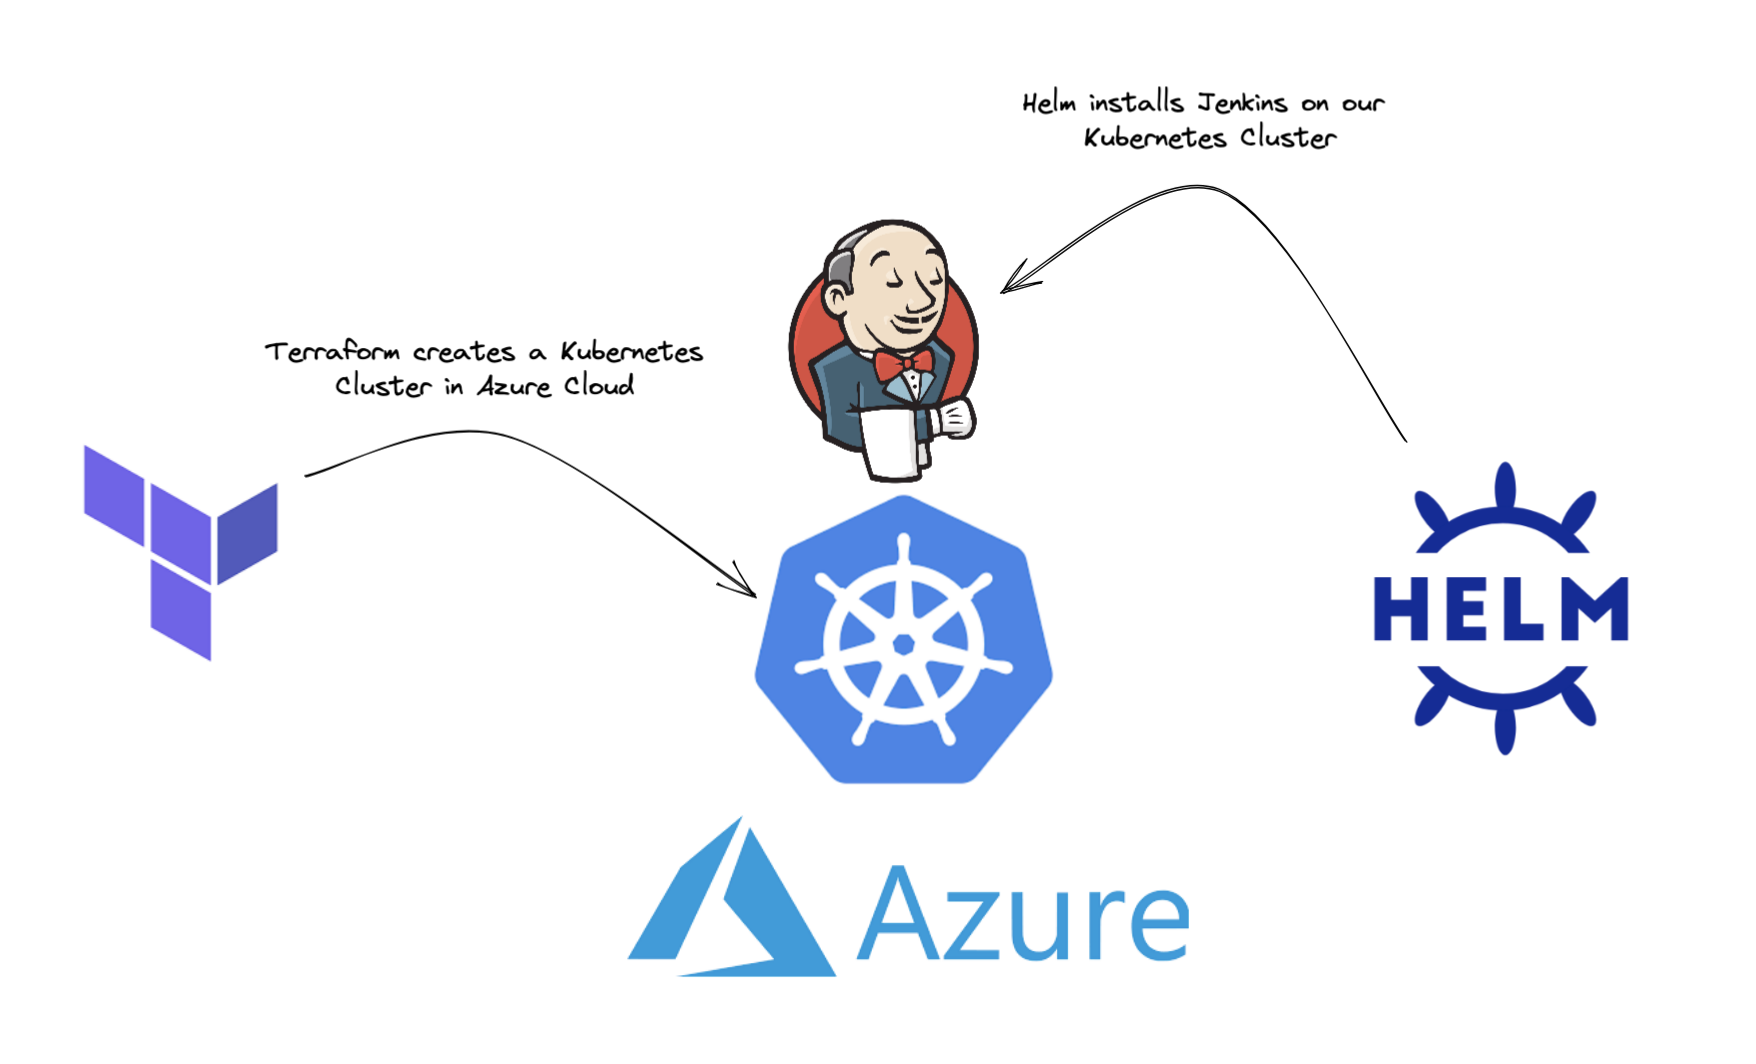
In this blog we use Terraform to create a Kubernetes Cluster in Azure Cloud onto which we install our Jenkins Controller using Helm. Both the Jenkins Controller and the Agents are defined as code; our Jenkins Controller using JCasC (Jenkins Configuration as Code), and our Jenkins Agents as part of our Declarative Pipelines.
Introduction
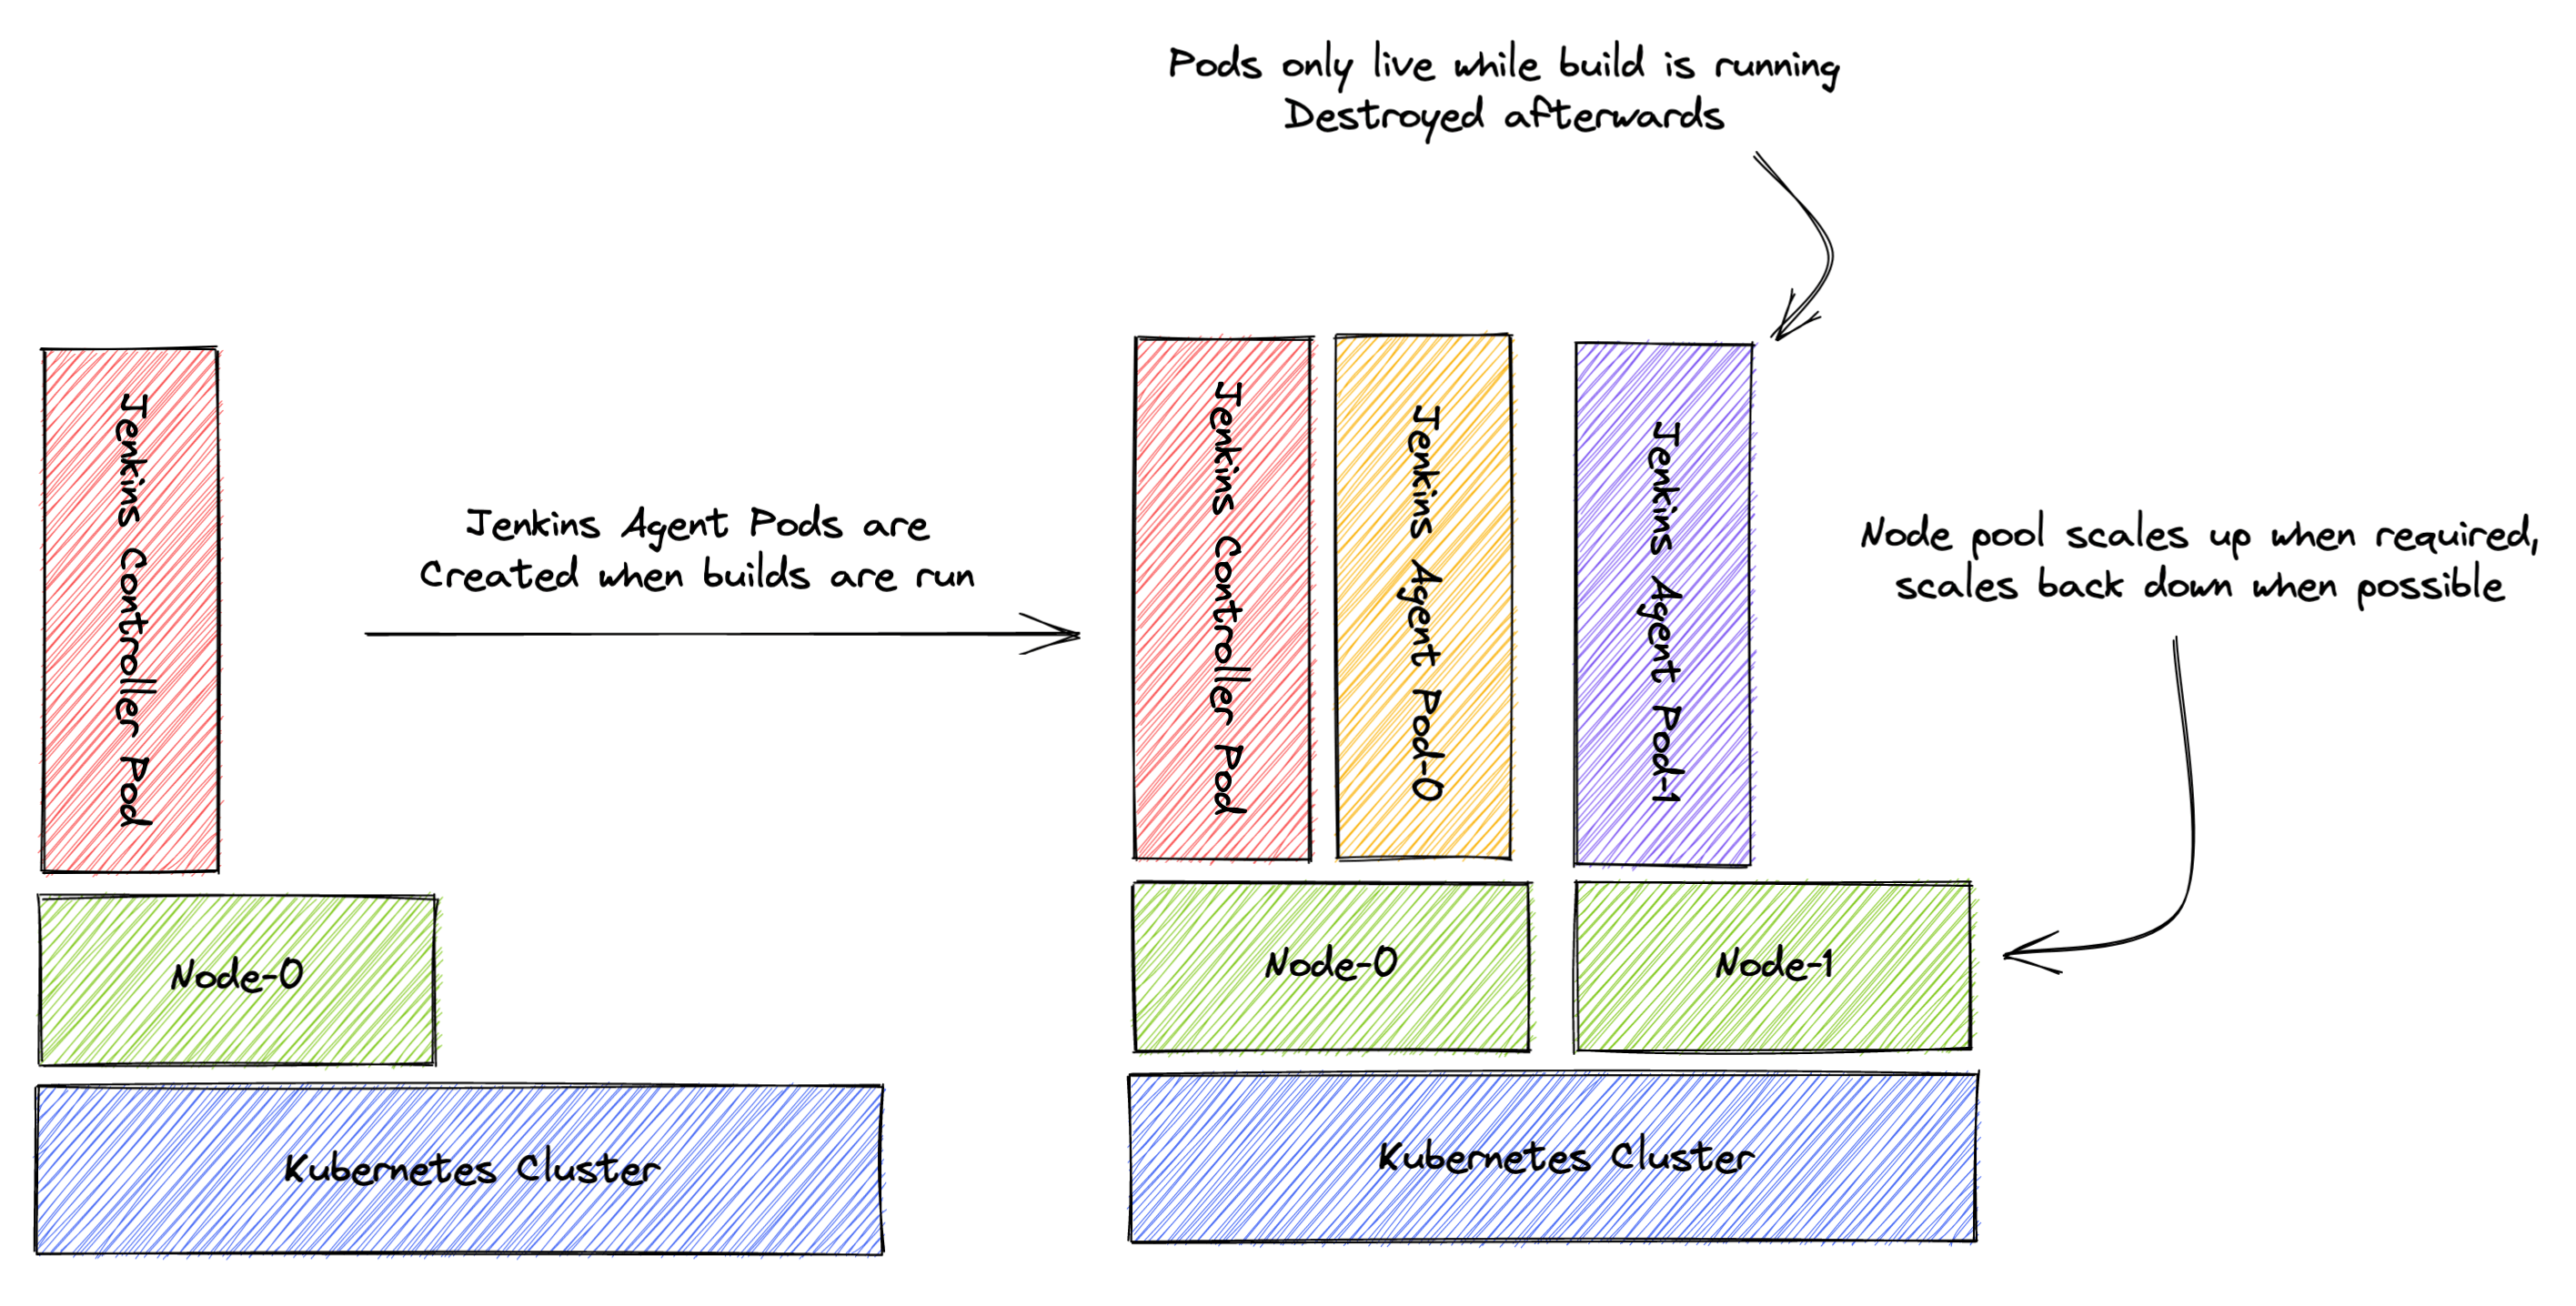
Jenkins Configuration-as-Code (JCasC) has been covered in great detail already; this blog will focus on the running of both Jenkins Controllers (previously Masters) and Jenkins Agents in Kubernetes. The really exciting thing about this approach is that Jenkins Agents can be defined per-job and spun up when needed! Together with an auto-scaling Kubernetes cluster, this means we have an auto-scaling Jenkins deployment which will run at minimal cost while idling and offer performance when necessary.
Terraforming our Kubernetes Cluster
In this blog, we will use Terraform to create our Kubernetes Cluster in Azure Cloud, but the approach will be the same for whichever IaC tool and Cloud Platform you choose.
We will skip over provider configuration, remote state etc. in this blog to keep things focused on the problem at hand. You can look at the complete example in the GitHub repository if you are interested in seeing the full configuration:
Github - Jenkins in Kubernetes example
resource "azurerm_kubernetes_cluster" "jenkinsk8sexample" {
  name                = "aks-jenkinsk8sexample"
  location            = azurerm_resource_group.jenkinsk8sexample.location
  resource_group_name = azurerm_resource_group.jenkinsk8sexample.name
  dns_prefix          = "aks-jenkinsk8sexample"

  default_node_pool {
    name                  = "default"
    node_count            = 1
    vm_size               = "Standard_B2s"
    enable_auto_scaling   = true
    min_count             = 1
    max_count             = 4
  }

  service_principal {
    client_id     = var.client_id
    client_secret = var.client_secret
  }
}
As seen above, we’re creating a Kubernetes Cluster with a single auto-scaling nodepool.
Once we’ve run
terraform apply
and the cluster is created, we can create the Jenkins namespace:
kubectl create namespace jenkins
Our cluster is now ready to have Jenkins installed using Helm.
Installing our Jenkins Controller
We will use Helm to install our Jenkins Controller in the Kubernetes Cluster. Helm is best thought of as a package manager for Kubernetes. First we need to add the Jenkins repo to our local Helm configuration:
helm repo add jenkins https://charts.jenkins.io
helm repo update
We can then run the install (upgrade) command:
helm upgrade --install jenkins jenkins/jenkins \
  --namespace jenkins \
  --version 4.1.8 \
  --set controller.adminUser="admin" \
  --set controller.adminPassword=$JENKINS_ADMIN_PASSWORD \
  -f custom_values.yaml
Note that our admin password is pre-configured in environment variable JENKINS_ADMIN_PASSWORD. Our custom_values.yaml file contains the JCasC values:
controller:
  installPlugins:
    - kubernetes:3600.v144b_cd192ca_a_
    - workflow-aggregator:581.v0c46fa_697ffd
    - git:4.11.3
    - configuration-as-code:1429.v09b_044a_c93de
    - job-dsl:1.79
  JCasC:
    defaultConfig: true
    configScripts:
      welcome-message: |
       jenkins:
         systemMessage: Welcome to Jenkins, you are. Managed as code, this instance is.
      example-job: |
        jobs:
          - script: >
              multibranchPipelineJob('jenkins-in-kubernetes-example-pipeline') {
                branchSources {
                  git {
                    id('jenkins-in-kubernetes-example-pipeline')
                    remote('https://github.com/verifa/jenkins-in-kubernetes-example-pipeline.git')
                  }
                }
              }
    securityRealm: |-
      local:
        allowsSignup: false
        enableCaptcha: false
        users:
        - id: "admin"
          name: "Jenkins Admin"
          password: "${chart-admin-password}"
    authorizationStrategy: |-
      loggedInUsersCanDoAnything:
        allowAnonymousRead: false
Each Helm chart comes with a default set of values (values.yaml) which is also the set of supported values which can be overriden. This is what our custom_values.yaml file does, so for example we are overriding the list of plugins to be installed, adding the job-dsl plugin so that we can declare our pipeline as code.
Of most interest in the custom_values.yaml file is probably the example-job value, which lists the jobs to be created upon Jenkins Controller instantiation. As you can see, we are creating a Multi-branch Pipeline Job with Git sources in another repository.
Once you have executed the helm upgrade command, the Jenkins Controller Stateful Set should be created in your cluster, which will trigger the creation of the Jenkins Controller Pod, hosting your Jenkins Controller instance. Once Jenkins finishes starting up, it will scan the Git repo defined in the Multi-branch Pipeline Job and run a build on each discovered branch.
The Jenkins deployment above will be deployed with ClusterIP services only, meaning it is not accessible from outside the cluster. This is fine for testing purposes, and the simplest way to access Jenkins locally is to run a Kubernetes port-forward:
kubectl port-forward svc/jenkins 8080:8080
This will forward traffic from 127.0.0.1:8080 (localhost) to svc/jenkins:8080 (Jenkins Controller ClusterIP), so while the kubectl port-forward command is running, you can navigate to http://localhost:8080 to access your Jenkins instance.
Configuring our Jenkins Agent
Let’s inspect the master branch of the Git repo configured as the source of our Multi-branch Pipeline Job:
pipeline {
  agent {
    kubernetes {
      yaml '''
        apiVersion: v1
        kind: Pod
        spec:
          containers:
          - name: maven
            image: maven:alpine
            command:
            - cat
            tty: true
          - name: busybox
            image: busybox
            command:
            - cat
            tty: true
        '''
    }
  }
  stages {
    stage('Run maven') {
      steps {
        container('maven') {
          sh 'mvn -version'
        }
        container('busybox') {
          sh '/bin/busybox'
        }
      }
    }
  }
}
What you see in the pipeline block above are two blocks:
- agent
- stages
The agent block defines the agent which will execute the steps in the stages block. As you can see in the agent block, we are able to use YAML to declare the Kubernetes Pod which will execute the job. Note that we declare two separate containers, one running the maven:alpine image and one running the busybox image.
In the stages block you can see that we run one command in each container. This is an example of how you can break up your pipelines into small tasks which can run in specialized containers, instead of building bloated container images containing all the tools you need.
Auto-scaling
Let’s take a look at Jenkinsfile in the large-pod branch of the pipeline Git repo:
pipeline {
  agent {
    kubernetes {
      yaml '''
        apiVersion: v1
        kind: Pod
        spec:
          containers:
          - name: busybox
            image: busybox
            command:
            - cat
            tty: true
            resources:
              requests:
                memory: "2Gi"
                cpu: "1000m"
        '''
    }
  }
  stages {
    stage('Run') {
      steps {
        container('busybox') {
          sh '/bin/busybox'
        }
      }
    }
  }
}
In the example above, a single busybox container is declared with large resource requests (2 GB memory and 1 CPU core). This exceeds the resources available on the single Node in the Kubernetes cluster initially, so we can see in the log that a second Node is created on which the Pod is then created and the Job scheduled:
Started by user Jenkins Admin
[Pipeline] Start of Pipeline
[Pipeline] podTemplate
[Pipeline] {
[Pipeline] node
Created Pod: kubernetes jenkins/test-2-v4rqd-2w5b2-nvfs2
[Warning][jenkins/test-2-v4rqd-2w5b2-nvfs2][FailedScheduling] 0/1 nodes are available: 1 Insufficient memory.
Still waiting to schedule task
'test-2-v4rqd-2w5b2-nvfs2' is offline
[Normal][jenkins/test-2-v4rqd-2w5b2-nvfs2][TriggeredScaleUp] pod triggered scale-up: [{aks-default-19934684-vmss 1->2 (max: 4)}]
[Warning][jenkins/test-2-v4rqd-2w5b2-nvfs2][FailedScheduling] 0/1 nodes are available: 1 Insufficient memory.
[Warning][jenkins/test-2-v4rqd-2w5b2-nvfs2][FailedScheduling] 0/1 nodes are available: 1 Insufficient memory.
[Normal][jenkins/test-2-v4rqd-2w5b2-nvfs2][Scheduled] Successfully assigned jenkins/test-2-v4rqd-2w5b2-nvfs2 to aks-default-19934684-vmss000001
[Normal][jenkins/test-2-v4rqd-2w5b2-nvfs2][Pulling] Pulling image "busybox"
[Normal][jenkins/test-2-v4rqd-2w5b2-nvfs2][Pulled] Successfully pulled image "busybox" in 2.945562307s
...
Once the job is complete, the Pod is destroyed. The AKS cluster auto-scaler will then, after a period of low pod activity, scale down the node pool back to the single node hosting the Jenkins Controller.
Going Further
Security
The example shown here is still far from production-ready, and there are many considerations to make, such as
- Persistent storage - what size and performance is required, and how should they be backed up?
- Networking security - what kind of Ingress/Egress rules should we take? What other restrictions should be put in place?
- Container security - we should (at minimum) prevent any container from running as root. How do we avoid potentially harmful images from being run?
Many of these considerations can be implemented using policies, perhaps your team or organization has a set of default cluster policies to use; if not, there’s no time like the present to create them.
Automation
Although we have automated many steps in a typical Jenkins deployment, we are still triggering the deploy itself manually. The deployment commands themselves can be automated - such as in Continuous Delivery.
One commonly-used setup is that each commit to the main branch in your Git repository triggers a deployment. This is a great way to
- enforce good SCM practices (developers never commit directly to
main) - ensure “what you see in
mainis what is deployed in production”
Summary
In this minimalist example, we’ve looked at how you can define both your infrastructure and Jenkins deployment as code, how to auto-scale both infrastructure and Jenkins agents and how Jenkins agents can be defined as part of your build pipelines to give complete freedom to developers on what kind of Jenkins agent their build pipeline needs. Hopefully this has given you the information you need to develop a solution like this on your own.